P.S. on my last post "Farewell Vancouver 2010"
In my last post I stated that I wasn't dazzled by the Vancouver opening ceremonies but I completely forgot about the fantastic performance of Leonard Cohen's Hallelujah by
K.D. Lang (click to watch the video) of Leonard Cohen's Hallelujah. I've been a fan of hers for a long time. She is an incredible singer/songwriter with a voice like no other. For those who have never seen or heard her before, this was a great venue to showcase her amazing talent.
A.T.C. 365 Challenge update
Daughter #1 wanted to get in on the action of rating the cards so for the month of March, we will be switching to an A.R. format (Ashlyn Rating). So after each description it will show a Ashlyn's rating for that day's card on a scale of 1 to 5, 1 being the worst and 5 being the best.

My card from 3/1 is called "The Reveler" and for this card I tried a different technique to create the background. I used some of the scraps of Glimmer misted coffee filters that I used to create my card "Spring Flowers" from 2/24 (see posting for Episode 10). I cut these scraps into small square and rectangular pieces and layed them down onto the card, similar to how they teach kids to make paper mosaics in 1st grade. I glued the filters down in no patricular color pattern, and allowed the pieces to overhang the edge of the card. When dried I trimmed the filters to fit the card. Next I took gold Cat's eye ink and inked around the edges of the card. I then detail cut the image of the Mardi Gras reveler from a magazine and glued her on top. I then stamped the Fleur de Lis in black in at the bottom, and topped off the card by spraying pearl Glimmer mist over the top for a little extra shimmer. A.R. 3.0

My card from 3/2 is called "Hotel de Paris". To make this card I started with a playing card that was lightly sanded for better adhesion, and cut the image of the Arch de Triomphe from the Tweety Jill "Travel to Paris" collage pack and adhered to the playing card as the backgroung. I then inked the edges with Tsukineko Versa Magic chalk ink in midnight blue. Next I then cut a small tag with my Cuttlebug die cutter out of some Tweety Jill paper that looked like old parchment. I inked the edges of the tag with Distress ink in walnut and used Tsukineko Versa Magic chalk ink in aqua and red and lightly added a little color to the top of the tag. Next I used some sepia ink and stamped a french postal type stamp to the upper right hand edge of the tag an black ink to stamp a small postage stamp on the bottom left of the tag using an imperfect stamp method. The title was cut from some DCWV travel paper and glued down. Lastly I punched a hole in the bottom right of the tag and inserted an Eiffel tower brad, and tied some blue ric rack ribbon to the top of the tag. The tag was then adhered to the card with some pop up dots. Finally I stamped a Fleur de Lis on the bottom left of the card. A.R. 4.5

My card from 3/3 is called "Country Kitchen" and I started this card again with a playing card as a base. I lightly sanded the card for better adhesion of the glue and cut a piece of background paper from my Tweety Jill paper pack that looked like old distressed paint. Next I inked the edge of the card with Distress ink in fired brick. I then cut a small advertisement for pears from some Graphic 45 paper (Domestic Goddess collection) along with some small squares of fruit that were on the border of the paper. I glued the advertisement to the middle of the card at angle, and the fruit squares were glued at the bottom. Next I stamped the chicken wire stamp from my Tweety Jill "Poultry Party" stamp collection with black ink at the bottom over the adverstisement and one of the squares. I next took a vellum wire rimmed tag and inked the inside with Distress ink in tea stain to age it, then stamped the round design with a another stamp from the Tweety Jill "Poultry Party" stamp collection. I topped the tag with some brown checked ribbon and adhered it to the card with glue dots. Lastly I detail cut the cherries and adhered them to the card with pop up dots. A.R. 3.5
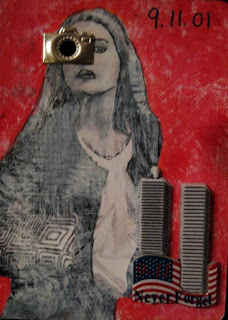
My card from 3/4 was called "Eyewitness to Tragedy" and for this card I tried something a little different. My normal process is that I find an image or background I like, or a technique I want to try and build from there. For this card I pretty much started out blind, other than I knew I wanted to do an altered art piece. I began by painting the background of the card with red Basics acylic paint. I then found the image of the girl and glued her to the card. I didn't really have a concept or plan yet so next I dry brushed white paint on the image of the woman and then did a little outlining with a fine point black marker. When I went to do one of the eyes I really messed it up, so I took my Crop O' Dile and punched a hole where her eye should go. In looking at all my brads and eyelets I found the camera and thought that might be neat but I still didn't have a clear plan. As I was doing this my daugther pulled out a decorative button of the Twin Towers and the lightbulb went off. Immediately the concept became clear. I've never been one to do pieces that have a lot of symbolism I'm not that deep a thinker and take a more the straight forward approach to my projects, but when the concept revealed itself this card became all about symbolism. The camera is one of the tools used to capture the tragedy, the white covering the woman is no longer paint, but became a woman covered in ash, the towers which stood so tall, and the red of the background now symbolizes the fire and blood. As one of many thousands who were so changed by the events of Sept. 11, 2001 this served as a reminder even to myself that it doesn't have to be the anniversary of that tragic day to remember the fear, loss and devastation we shared as a nation. Something as simple as a decorative button can remind us to "never forget" A.R. 4.0 (since Cassidy finding the button served as the inspiration she rated the card too. C.R. 5.0)
Update on Daughter #1's Room Redecoration
As promised from my last post, here are some pictures of the room with the second coat (the dark purple) that we put on the paintable wallpaper.
It's hard to see the white chair rail moulding separating the 2 new colors. This is going to be repainted soon, most likely in black, but possibly a dark gray.

Here's what the new walls look like together with the new comforter, which was the inspiration for the new color scheme. It's a reversable comforter that is all black on the other side.

Ashlyn posing next to the new wall color. I think she is starting to like how this is coming along.
Visual Poetry Photomanipulation Week 4 with Susan Tuttle
I just completed my assignments for my last week of this great class. It has been a fantastic experience and I've learned so much. I can't wait to apply some of the techniques learned to some of my other photos.
Lesson 1 this week was called "The Significant Object", and it was about how to apply a selective recolor to bring color back to an area or object after a color photo has been turned to black and white to draw the eye to one place or object. I had taken a previous class in some digital photo techniques, but Susan's method was much easier and I think provided more dramatic results.

Here is my before photo

Here is the after photo
Lesson 2 this week was called "Faux Midnight" and it taught us to create a photo that gives the subject the appearance of being night time with a moonlit illumination. I'm not sure I was entirely successful in the application of this lesson, but I was happy with the photo results even if it didn't exactly come out like the lesson intended. I definitely didn't take the photo as dark as I needed to in order to achieve the true faux midnight feel, but I liked the dramatic change in the photo.

Here's the before photo

Here is the after photo
Lesson 3 was called "Landscape Atmosphere" and taught us how to create mood and atmosphere in landscape photos.
Here's the before photo
Here's the after photo
This class has been such a great experience and I highly recommend it to anyone who has a basic knowledge of Photoshop Elements. Susan Tuttle is a great teacher and if your interested in learning more about her you can read her
blog here or you can visit her
website here. I can't wait for more of Susan's classes.
To see more photos that I've changed using some of Susan's techniques or to just see some of my other photomanipulation work please feel free to visit my
flickr page.
Well that's all I have for today. Comments are always welcome so please feel free to drop me a line. Thanks for stopping by and come back soon!


 Here's what the new walls look like together with the new comforter, which was the inspiration for the new color scheme. It's a reversable comforter that is all black on the other side.
 Ashlyn posing next to the new wall color. I think she is starting to like how this is coming along.
  Here is my before photo
  Here is the after photo
 Here's the before photo
  Here is the after photo

No comments:
Post a Comment
Please leave a comment, we would love to hear from you!