Showing posts with label Julie Fei-Fan Balzer. Show all posts

Wednesday, May 15, 2013

What's creating today!


Hey everyone, 

Even though I have a twitter account I confess I don't really read many of the tweets from the people I follow.  But as luck would have it I happened to catch one from Jule Fei-Fan Balzer about an art postcard swap being initiated by iHanna.

I have from time to time seen some of iHanna's blog posts (you can check out her blog here) in the past about art journaling, but I was unaware that she held this wonderful postcard swap.  The concept was simple for a small fee you get 10 names and addresses. you create 10 original 4" x 6" (not store bought) postcards and mail one to each name on your list by a specific deadline.  In return you should receive 10 original postcards via mail.

DIY Postcard swap banner 2013


Since I found out about the swap at the last minute I was hard pressed to create 10 cards in just a few days.  And for those of you who know me very well, I obsess over things a lot so this was a real challenge for me.  I decided to keep my concepts simple.  The whole idea of the swap to me was to promote friendship through art.  So why not extend a "Hand of Friendship" to those whose names I received with a little help of a Balzer Designs stencil. 


(Mediums: watercolors, ink, gel pens, Micron pens, and a white Signo pen.)

(Mediums used: watercolor, Micron pens, and a white Signo pen)

(Mediums used: watercolors, pen and ink, gel pens, and a white Signo pen)

(Mediums used: watercolors, Micron pens, gel pens, white Signo pen, and archival ink)


(Mediums used: watercolors, Micron pens, white Signo pen, and pen and ink)


Admittedly my short attention span got the better of me and I got bored with hands after the first 5 so I tried to think of what else to me could mean friendship and of course the phrase "extend an olive branch" came to mind so I switched to "Trees of Friendship".


(Mediums used: Micron pens and pan pastels)


(Mediums used: watercolors and Micron pens)
 

(Mediums used: watercolors, Micron Pens and white Signo pen)
 

(Mediums used: watercolors, Micron pens and gel medium)
**The tree and leaves were cut from a Japanese newspaper


 (Mediums used: watercolors, archival ink, Micron pens and a white Signo pen)


Sadly this swap is over but hopefully I will hear about more swaps.  I often thought it would be fun to find a group and get involved with a collaborative art journal or quilt project too.  I'll keep on the lookout or who knows maybe start one myself. 

Thanks for stopping by and come back soon.  I've had a lot of projects and ideas rolling around in my head lately, which I'm looking forward to sharing.

Comments are welcome so tell me

What are you creating today?

Wednesday, January 18, 2012

What's new at The Loft - Episode 107

Art Journal Play

The New Year for me is about the renewal of a quest, the pursuit of a dream, and the beginning of new adventures and challenges.   Challenges can be inspirational, frustrating but also great motivators.  I had first hand experience with this when I did my ATC 365 challenge in 2010.  So aside from other projects I hope to get off the ground in 2012, I have also recently joined the Art Journal Everyday group hosted by Julie Fei-Fan Balzer of Balzer Designs.

I have been following Julie's blog for a few years now and she is always a great source of inspiration.  Her Art Journal Everyday group is what I call a great no pressure challenge.  All it requires (which is not really a requirement, more like a goal to strive for) is for you to work in your journal for 10 minutes everyday.  You don't have to complete a page everyday, it could be as simple as just laying down a background, but the hope is to have at least one page to post to Julie's site and the group Flickr pool once a week.  You can visit my flickr pool to see my entries this year so far.

So instead of sharing those entries I thought I would share some other art journal pages I have done in the past. 


 The way I work is to lay down a background or start a foundation for a page, but if I get stuck creatively or I'm not happy with the direction things are going I move on and come back to it later.  So it goes without saying that I tend to have some "works in progress" in my art journal which I have shared below.  


I'll post pictures of the completed pages another time.


Art journaling is a great way to experiment with new products and techniques and a fantastic creative outlet.  I have never been one to keep a "traditional" journal as I do not like recording my own personal thoughts, but with art journaling I've found I can share something of myself  in a different way.

If you are an art journaler drop me a line.  Comments are welcome, so don't be shy about telling me what you think.  Thanks for stopping by and come back soon.

Tuesday, June 7, 2011

What's new at the loft - Episode 91

Cassidy's Spring Musical

Proud mom that I am I have to show off pictures of my baby Cassidy as one of the lead performers in her School's spring musical.  Cassidy is quite the ham and really loves being on the stage.  We still don't know what the point of the crazy costume was but she didn't seem to mind.  And yes that is a swimming ring around her waist and she does have flippers on her feet.  At one point she had a snorkel tube in her mouth, a tiara on her head, and swimming goggles on as well.   No matter though, because she did fantastic!


Ok so I have a few more projects to show you for Julie Fei-Fan Balzer's "It's Sew Easy" class.

Another project was an accordion book


Paper Fabric

This was made using a fat quarter of fabric with a glue mixture to adhere tissue paper and thin colored opaque paper alone with various fibers to make a paper fabric.  After I made the fabric I am to make a small quilt out of it, but I haven't gotten to that point yet.


Well that's all I have for today.  I'm still working away so hopefully will have more to show you real soon.  Thanks for stopping by and come back real soon.

Tuesday, May 31, 2011

What's new at the Loft - Episode 90


Truth be told I got very behind in this class.  I loved the class, and really enjoyed the techniques I've learned, but it was very labor intensive, and I had way too much going on to keep up.  My own fault of course, but I am glad that I have a year to watch all the videos and finish all the projects.  Julie's class was amazing and she really gave a lot of information and was definitely worth the money.

Here are more projects that I had to do for the class.  The first is a mixed media clutch purse.  The project called for us to first paint up some canvas.  Luckily I had several large sheets of painted canvas leftover from Alisa Burke's Graffiti Chic class.  I had been saving them, hoping to one day find a project for them.  Julie's class was the perfect project to put these painted canvas pieces to good use.

Here's how my purse turned out.

Here is the front


Here is the back


We also had to make a mixed media strip pillow

So I took a lot of scrap fabric, a lot of paint, and a fresh Sharpie marker and here is the result.


 Another project we had to create was fabric ATC's using a transferred image.  Most who know me will tell you how much I love ATC's, after all why would I make one a day for an entire year, right.  In a weird coincidence it also required us to do an image transfer which is one of my favorite techniques to use when I art journal.  So this project was right up my alley.  I used white muslin that I glimmer misted with sunflower yellow and vintage pink.  After it dried I cut these two butterflies out and used gel medium to do the transfer.  The preferred method to do a transfer on fabric is to use a transparency, but I didn't have any so I did a direct image transfer, which makes the fabric a little stiff where the transfer was done.  I then made a mini quilt sandwich with batting and another piece of muslin for the back, then took it all over to my machine and free motion stitched the scrolls and outlined the butterflies.  Lastly I used a zig zag stitch around the edges.  And here is how it came out.


Speaking of Art Journaling

It has taken me a while but I finally got around to finishing the Art Journaling page I started when I posted about it way back on March 30th.  I had only finished one side of the page so here is where I left off.


and here is where I ended up


Well that's all I have for today.  Comments are always welcome so feel free to drop me a line and let me know what you think.  Thanks for stopping by and come back soon.


Monday, May 2, 2011

What's new at The Loft - Episode 89

My First Ever Art Quilt

I am having so much fun in this class and am loving what I have learned so far.  However I have a confession, in that I am a little behind in the class.  Unfortunately my busy life often gets in the way of my creative pursuits, so I have to say a big THANK YOU to Julie Fei-Fan Balzer for allowing access to her class for a year.  It's really taken some of the pressure off.  I also have to confess that I have skipped a few projects (I'm going to try to catch up on the missing ones this weekend) so that I could get to the week on free motion quilting.

In a strange coincidence I started making a quilt just before this class started.  My good friend Teri has been so kind and patient as she has walked me through all the steps involved.  And although it is not completed yet, I am hoping to finish quilting it very soon. 

I am by no means new to sewing, as I have a B.S. degree in Fashion and Textile Technology, but I literally hadn't done any sewing in almost 20 years ago until early 2010 when I purchased an inexpensive
Brother machine for light sewing and repairs.  About 6 months ago I made a few aprons and I have been a sort of sewing maniac since.

With this renewed love of sewing however I found that the machine I had was very limited.  For example my sewing machine had a free motion foot but didn't allow you to drop the feed dogs, and when you try to do any free motion with a darning plate, the bobbin thread gets all mangled.  And although the machine has been a good workhorse machine for the money I paid, I have outgrown it.  So I bit the bullet and recently purchased a new Brother machine one that can do free motion with ease.

How does this relate to It's Sew Easy you might ask, well one of the assignments was to make an art quilt using free motion stitching.

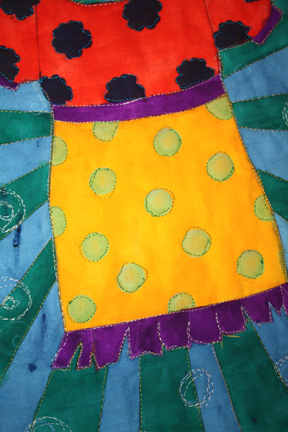
I started with bleached muslin and cut 2 pieces the same size.  On one I traced the dress image, provided for by our teacher and the other I put to the side for now.  Next using some Koi watercolors I painted in the dress. 


I drew some circles into the fabric with a resist crayon and then using tube watercolors I mixed up some blue and painted around the dress (I used the resist crayon around the dress as well to keep the blue from bleeding).


I had some blue paint left over so I added lots of water and used it as a dye bath for the backing piece.


Next I added some visual interest to the skirt by using a dauber and stamped polka dots on it with VersaCraft ink which can be used on fabrics.


The then used a stencil and fabric marker to draw the flowers on the dress top.


To add more interested I painted radial stripes on with more concentrated green watercolor paint.


Once the top was dry I carefully ironed the front and back piece and then made my quilt sandwich by placing the backing fabric down first, then batting on top, and then added the quilt top over this right side up, and pinned with quilt pins.  I have never free motioned sewed in my life and need a lot more practice at it but I jumped in with both feet and tried not to become too intimidated by it or obsessed with perfection.  I started by stitching around the dress, and then stitched the radial stripes.  I then stitched the polka dots and finally the flowers.


I then free motion stitched some circles on top of the radials where some of the resist crayon was.


I haven't yet learned how to do proper quilt binding yet, so I sewed on some store bought garment binding to finish off the edges. 

And here is my finished project. 


This was a fun project, but the first thing I learned was to never use watercolor again.  By the time I was done, the surface of my new machine was green, and I had to do a lot of scrubbing to get it off.  Second was to practice more with free motion.  I definitely need to work on feeding the fabric through to get more even stitches. 

Well, that's all I have for today.  I hope you liked it. Comments are always welcome so feel free to drop me a line and let me know what you think.  Thanks for stopping by and come back soon.

Wednesday, April 13, 2011

What's new at The Loft - Episode 87


Just wanted to share some photos of my projects for the "It's So Easy" class I have been taking with Julie Fei-Fan Balzer.

Our first project was to create a mixed media butterfly banner. Since I didn't have a bunch of butterfly punches to complete the project I pulled out my Cricut and cut lipstick, shoes, mirrors, gloves and some bottle of nail polish out of painted file folders to make a more girlie banner.

 Girlie Banner


The first part of the project was to decorate some file folders, I painted mine with watercolor paints and then stamped some and used gold pen and ink on others.  For a few of the file folders I also used resist crayon before I painted them. After I cut the folders in the Cricut, the pieces were then sewn on the sewing machine.


Decorative Tags
Our next project was to make some decorative tags. The first was made with layered fabric circles sewn on the tag.  The second tag was made with torn pages of a book, layered with text facing different directions and then sewn.  The last tag was made with hand colored lace, layered and sewn to the tag.  I have to admit I'm not a big fan of tags, so this project didn't inspire me as much.  However I did think the circle tag came out cute, the photo here doesn't do it justice, as it looks much nicer in person.


Stuffed Heart Ornament

For our next project we were to use an old paint rag to create this stuffed heart.  Instead I used some white muslin and painted it with watercolor crayons, acrylic paint and gold marker.  This was such a cute project I can't wait to make a few more.


Unfortunately I'm a little behind on my class projects,  so I will be working this week to complete a mixed media pillowcase and an alphabet clutch.  I'll be posting about those soon.

Comments are welcome so please let me know what you think  Thanks for stopping by and come back soon.