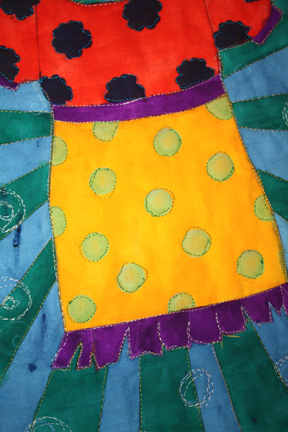
My First Ever Art Quilt
I am having so much fun in this class and am loving what I have learned so far. However I have a confession, in that I am a little behind in the class. Unfortunately my busy life often gets in the way of my creative pursuits, so I have to say a big THANK YOU to Julie Fei-Fan Balzer for allowing access to her class for a year. It's really taken some of the pressure off. I also have to confess that I have skipped a few projects (I'm going to try to catch up on the missing ones this weekend) so that I could get to the week on free motion quilting.
In a strange coincidence I started making a quilt just before this class started. My good friend Teri has been so kind and patient as she has walked me through all the steps involved. And although it is not completed yet, I am hoping to finish quilting it very soon.
I am by no means new to sewing, as I have a B.S. degree in Fashion and Textile Technology, but I literally hadn't done any sewing in almost 20 years ago until early 2010 when I purchased an inexpensive
Brother machine for light sewing and repairs. About 6 months ago I made a few aprons and I have been a sort of sewing maniac since.
With this renewed love of sewing however I found that the machine I had was very limited. For example my sewing machine had a free motion foot but didn't allow you to drop the feed dogs, and when you try to do any free motion with a darning plate, the bobbin thread gets all mangled. And although the machine has been a good workhorse machine for the money I paid, I have outgrown it. So I bit the bullet and recently purchased a new Brother machine one that can do free motion with ease.
How does this relate to It's Sew Easy you might ask, well one of the assignments was to make an art quilt using free motion stitching.
I started with bleached muslin and cut 2 pieces the same size. On one I traced the dress image, provided for by our teacher and the other I put to the side for now. Next using some Koi watercolors I painted in the dress.
I drew some circles into the fabric with a resist crayon and then using tube watercolors I mixed up some blue and painted around the dress (I used the resist crayon around the dress as well to keep the blue from bleeding).
I had some blue paint left over so I added lots of water and used it as a dye bath for the backing piece.
Next I added some visual interest to the skirt by using a dauber and stamped polka dots on it with VersaCraft ink which can be used on fabrics.
The then used a stencil and fabric marker to draw the flowers on the dress top.
To add more interested I painted radial stripes on with more concentrated green watercolor paint.
Once the top was dry I carefully ironed the front and back piece and then made my quilt sandwich by placing the backing fabric down first, then batting on top, and then added the quilt top over this right side up, and pinned with quilt pins. I have never free motioned sewed in my life and need a lot more practice at it but I jumped in with both feet and tried not to become too intimidated by it or obsessed with perfection. I started by stitching around the dress, and then stitched the radial stripes. I then stitched the polka dots and finally the flowers.
I then free motion stitched some circles on top of the radials where some of the resist crayon was.
I haven't yet learned how to do proper quilt binding yet, so I sewed on some store bought garment binding to finish off the edges.
And here is my finished project.
This was a fun project, but the first thing I learned was to never use watercolor again. By the time I was done, the surface of my new machine was green, and I had to do a lot of scrubbing to get it off. Second was to practice more with free motion. I definitely need to work on feeding the fabric through to get more even stitches.
Well, that's all I have for today. I hope you liked it. Comments are always welcome so feel free to drop me a line and let me know what you think. Thanks for stopping by and come back soon.